What Is a Septic Tank?
A septic tank is a buried, water-tight container that holds wastewater. Solid waste settles to the bottom, while oil and grease float to the top. The liquid wastewater (effluent) exits the tank into a drain field.
Avoid flushing non-biodegradable materials like coffee grounds, diapers, cat litter and cigarette butts. These materials can clog the septic tank and absorption system. For more information, click the Septic Tank Armadale to proceed.

In 1860, a Frenchman named Jean-Louis Mouras was tired of walking outside to use the outhouse. He wanted a better solution for human waste disposal, so he invented the first septic tank. This revolutionary system was a concrete receptacle that allowed organic matter to break down through an anaerobic process. This significantly reduced the volume of human waste and rendered it less harmful to the environment.
Today’s septic systems follow Mouras’ original design, but are made of more durable materials. They also incorporate aerators that create an aerobic environment. This allows for faster breakdown of organic matter and increases septic tank efficiency. In addition, modern septic tanks are constructed of fiberglass, polyethylene, or high-density polyethylene (HDPE). These materials are more durable than concrete and are resistant to corrosion and chemical degradation.
Wastewater from your toilets, showers, bathtubs, sinks, and washing machines run into a septic tank. The solids in these wastewater particles sink to the bottom of your septic tank and form sludge. Fats and oils float to the top and form a layer of scum. Anaerobic bacteria living in your septic tank feed on these organic wastewater pollutants. Liquids flow from your septic tank through an effluent filter near the outlet. This filter ensures that no solids make their way into your absorption field where they could clog and reduce the performance of your system.
A standard septic tank holds between 1,000 and 2,000 gallons of wastewater. It has one inlet opening from your home and an outlet that leads to a distribution box. The distribution box is a concrete cube with multiple outlets that distribute wastewater evenly across a drain field. This distribution system is the heart of your septic system and ensures that all areas of your drain field receive equal amounts of wastewater.
Once wastewater leaves your septic tank, it travels through a series of pipes that are buried underground. The piping is connected to a perforated drain field that is covered with gravel and soil. The sewage seeps through the ground and is absorbed by the grass above.
In order for your septic system to work correctly, it will need several important parts. These parts include the septic tank itself, the inlet pipe, and the septic drain field. These parts will help you keep your home safe and healthy while reducing the amount of waste that ends up in your environment. You will also need to have the septic tank pumped regularly by a professional.
A septic tank is a watertight container that is usually buried underground. It holds wastewater for a long time to allow microorganisms to decompose household waste. During this process, the waste is separated into three layers. The bottom layer is called sludge, the middle layer is known as scum, and the top layer is made of oils, fats, and soap byproducts, which float to the surface.
The inlet pipe channels the water from your home’s drains into the septic tank. This will help prevent septic systems from overflowing. It will also help reduce the size of the septic tank, which will increase its lifespan and efficiency. It is important to have this inlet pipe properly installed so that the wastewater doesn’t flow back into your home or cause other problems.
After the septic tank, the wastewater flows into the septic drain field. It will pass through the inlet baffle, the effluent filter, and the outlet baffle. These components will prevent solid waste and sludge from entering your drain field. They will also ensure that only clean wastewater leaves the tank.
Septic tanks are an effective way to dispose of wastewater in a natural and environmentally friendly manner. They are also less expensive than traditional septic systems and require much less maintenance. In addition, septic tanks will reduce the need for chemical additives in your home and the surrounding soil. They also cut pollution by removing bacteria from the wastewater before it is released into the soil. They can even boost plant growth and encourage local wildlife. These benefits make septic tanks a great choice for homeowners. But before you buy a septic tank, it’s important to understand its function and how it works.
Septic tanks are a basic form of sewage treatment. Wastewater flows from household drains through one main pipe leading to the tank. In the tank, solid waste settles at the bottom while oils and grease float to the top. Bacteria inside the septic tank break down the solids so that liquid wastewater can exit into the leach field. A properly-functioning septic system can last up to 40 years. Keeping up with maintenance needs can help prolong its lifespan.
A septic tank should be pumped every two to five years. Pumping the tank removes the waste and prevents sewage backups in the house. The frequency of the pumping depends on how many people live in the home, how much water is used, and what types of waste are put into the septic system.
If the septic tank isn’t pumped regularly, it will eventually fill up and contaminate the groundwater. It’s important to know the signs of a full tank so that you can schedule a professional inspection and repair services before it’s too late.
Signs of a full tank include a slow draining toilet, a puddle in the basement, and a foul smell. You should also avoid flushing things that don’t break down in the septic tank, including coffee grounds, cigarette butts, paper towels, and feminine hygiene products. Some household cleaners and bleach can kill the bacteria in a septic tank, so you should use them sparingly.
It’s also a good idea to keep detailed maintenance records of the septic tank and system. This will help future owners understand how the septic tank and system work, and it will make the home more appealing to potential buyers. In addition, it’s important to keep trees and shrubs away from the septic tank and leach field, as they may clog or damage the system.
A septic tank system is an expensive investment, and it’s important to protect it from damage. Avoid driving vehicles or heavy equipment over the tank and system components, as this can compact the soil and cause leaks. It’s also a good idea to map out the location of the septic tank and system components, or mark them with stakes, before you plant, landscape, build structures, or dig near the system.
A septic tank can be expensive to install or replace, but there are several financing options available to help homeowners afford this costly system. Home improvement loans are a popular choice, and there are also government-sponsored grants and low-interest loans available for those who cannot afford to pay for the system upfront. It is important to compare prices and quotes from multiple contractors before making a decision.
The cost of a new septic tank can vary depending on the size of the household, the type of tank material and installation fees. Additionally, it is important to factor in the cost of any necessary permits and inspections. In some cases, permits can add up to $1,650 or more to the total cost of a septic tank.
In order to minimize the costs of a new septic tank, it is best to hire professionals for the installation process. This will ensure that all of the work is done properly and that the septic system will function as intended. The cost of a professional septic tank installation can range from $5,822 to $8,518.
During the installation process, it is essential to remove any obstructions that may interfere with the excavation and installation of the tank. This includes any trees, shrubs or structures that are located in the septic tank area. A professional land clearing company can typically clear the necessary space for septic tank installation at a rate of between $1,210 and $4,820.
Once the septic tank is installed, it must be properly maintained. Regular maintenance includes a routine pumping of the tank and leach field. The liquid that drains from the septic tank into the leach fields contains minerals and nutrients that will benefit your lawn and landscaping. It is important to have the septic tank pumped every three to five years to prevent the solid waste from overflowing and damaging your leach field.
During the pumping process, a septic tank professional will ensure that all of the solid waste is removed from the tank. This is essential to reducing the risk of clogs and other problems that could damage your septic tank and septic system. Septic tanks also need to be cleaned regularly to remove any sludge layer that builds up. The sludge layer is composed of solid waste and anything else that has made its way into your septic tank and is more dense than water.
Bathroom Remodeling – Boost Home Value and Make Your House More Comfortable
Bathroom Remodeling Richmond VA is a great way to boost home value and make your house more comfortable. This project can vary from a simple repainting to an extensive overhaul.
Some alterations require building permits, especially when they affect plumbing or change support structures. It is important to hire licensed professionals.
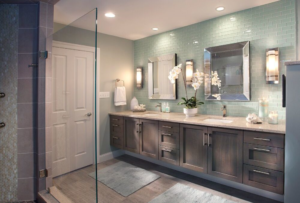
A bathroom remodel can vary from a simple makeover with new fixtures and paint to a full-scale room overhaul. A complete renovation may involve a major structural change to the footprint of the space, which can include dropping walls, rerouting plumbing pipes and electrical wiring, and replacing everything from the toilet and tub to showers, vanities, cabinets, and more.
This type of project can be more expensive than a simple makeover. However, a new layout can make the space more functional and add value to your home. Regardless of the scope of the renovation, planning is essential. A well-conceived plan will help the project run smoothly and minimize any unexpected problems that might arise.
Having a good plan will also ensure that you stay within your budget. A good way to do this is by creating a floor plan of the current bathroom and your desired remodel. You can use an online bathroom design tool like RoomSketcher to make this process easier. This software is easy to use and can be accessed from any device with an internet connection.
One of the most important decisions in a bathroom remodeling project is determining where to place all of the major features of the space. This will influence the design of your room and determine how much space you have for things like cabinets, appliances, and storage. For example, if you have limited space for a tub and shower, you might choose a single-wall layout that places the toilet and sink on the same wall. This is a hardworking solution that saves on plumbing costs.
Alternatively, you could create an open-concept layout by removing the wall between the toilet and sink. This will give you more room for a large walk-in shower or freestanding soaking tub. This is a beautiful and modern design that can make the space feel bigger and more spacious. However, it would be best if you remembered that this design will require a lot of plumbing and electrical work, which will increase the renovation’s price tag. It is recommended that you try to avoid moving any load-bearing walls and avoid rerouting any plumbing lines. These changes can be costly and time-consuming, leading to potential water damage in the future.
Bathroom fixtures and fittings play a pivotal role in your bathroom’s design, so choosing functional and stylish ones is important. It is also important to prioritize quality and durability. High-quality fixtures will last longer than cheaper options and will likely withstand frequent use.
To start, decide on the aesthetic you’d like to achieve with your bathroom remodel. Do you prefer a minimalist look, or would you rather go with a more traditional style? This will help you narrow down your fixture selections, as there are many different options on the market.
Next, consider the layout of your space. There are several different designs to choose from, including single-wall, L-shaped, and U-shaped layouts. Once you have a design in mind, it’s time to select your fixtures and fittings.
Faucets are a crucial part of any bathroom, and there are many styles to choose from. You’ll want to consider the material, durability, and finish. You can also choose from a wide range of faucet handles, from classic metals to bold designs. Additionally, it’s important to consider the water-saving features of your fixtures. Using low-flow toilets, shower heads, and faucets will save you money on your water bill.
Similarly, bathtubs are available in a variety of styles and materials. Freestanding tubs are a popular option for a statement piece, while alcove and drop-in tubs are ideal for smaller spaces. You’ll also want to consider the style of showerhead, such as a rainfall or handheld head, and whether you want extras like body jets.
Lastly, don’t forget to include storage solutions in your plan. Cabinets and shelving are great ways to maximize space and make your bathroom more organized. You can also opt for a wall-mounted medicine cabinet to save floor space. Make sure you have all the necessary parts and tools for your renovation before beginning work.
When planning the layout of your new bathroom, think about the materials you want to use. You can find a wide range of wall and floor coverings, countertops and more, with options ranging from economical to luxurious. Consider who will use the bathroom, as well as your budget, to help you determine the must-haves and nice-to-haves for your renovation.
To ensure a smooth, safe project, you’ll need the right tools and equipment. Basic hand tools like pliers, hammers and tape measures are essential. Carpentry tools include a square, level and wood saw. A reciprocating saw quickly cuts through materials like wall studs, plywood subfloor and drywall. It can also cut metal pipe, tubing and electrical wire. During the demolition phase, wheelbarrows and shop vacuums make it easier to transport and dispose of heavy materials like broken tile and wood.
If you’re changing the bathroom footprint, a construction calculator and contractor estimates will help you accurately estimate your costs. Also, check shipping periods for the materials you need to avoid delays in getting them. Before starting the renovation, clear out the space and designate a temporary location to store your belongings during the process. You should also set aside a space to hold trash and recycle until the remodel is complete.
Depending on the bathroom’s intended function, you may need to install moisture-resistant or specialty materials. For example, a shower wall can benefit from being reinforced with cement backerboard. A wet room floor can be made from vinyl tiles, sheet vinyl or porcelain planks that are grouted and sealed for water resistance. For cabinets, plastic laminate and thermofoil withstand moisture better than traditional wood. Hardware finishes such as nickel, chrome and solid brass resist corrosion in damp environments.
Consider adding upgrades to address accessibility issues, such as grab bars and a raised toilet. If you have older relatives who live with you or are considering aging in place, these features will allow them to continue living comfortably at home. Similarly, if the family pet spends a lot of time in the bathroom, you can install a doormat to help reduce tracking of mud and dirt throughout the house.
If you’re thinking about renovating your bathroom, it’s important to set a budget for the project. This will help you achieve a design plan that fits your needs while staying within your financial constraints. It will also prevent you from overspending and feeling buyer’s remorse later. Having a clear idea of your budget will save you time and money throughout the remodeling process.
Depending on your style and preferences, the cost of a bathroom remodel can vary significantly. On average, a full-scale renovation costs around $10,000, though the total can go higher if you’re working with a general contractor or undertaking a large-scale remodel. The amount of work and installation involved will also impact the overall price tag.
Surface-level remodels are less intensive than a full renovation and involve replacing the existing fixtures, such as a new vanity, shower, or tub. This is a great option for homeowners who want to upgrade their bathroom without having to deal with demolition and other major changes.
While surface-level remodels typically don’t change the layout of the room, they can still be labor-intensive and require professional services. These projects may include things like drywall, plumbing and electrical work.
Full-scale remodels are a complete overhaul of the entire space, including removing walls and moving utilities. These types of projects are more expensive but can increase the home’s value. The return on investment (ROI) of a full-scale bathroom remodel is usually between 70-75%.
Once the scope of the project is defined, it’s important to choose a general contractor with experience in the field. A reputable company will be able to offer you a detailed estimate for the cost of your renovation and answer any questions that you might have. It will also take care of the necessary permits and inspections.
The next step is to choose a material palette and decide what kind of style you’d like. There are countless choices for both cabinets and countertops, and you should explore them all to find the best options for your home. There are also a number of other small details that you should consider, such as lighting, fans, mirrors and accessories.
How to Transform a Living Room in a Few Hours
One of the quickest ways to transform a living room is by applying a fresh coat of paint. While painting can make a big impact, it also requires careful planning to avoid costly mistakes that can be difficult to undo.
Bunbury Painting Service has ways to work with living room painting. Including using colors to create a striped feature wall or subtly zone separate rooms within an open-plan space.

A new coat of paint is one of the most affordable ways to transform a living room. However, it takes time and effort, especially if the space is large or difficult to reach. Before you start painting:
- Gather all your supplies, including caulk, drop cloths, brushes, and a tape measure.
- Remove all wall hangings, curtains, switches, and outlet covers before beginning to prep the walls for paint.
- Caulk any cracks or holes, and wipe surfaces down to remove dust and dirt.
If you’re not up for a full-scale paint job, add stripes to your living room with a simple, classic look that requires little skill. Paint your stripes in a color that coordinates with your decor and complements your existing furniture. Keep the color scheme simple to create a clean, modern look, or go for a more dramatic effect by incorporating multiple shades of contrasting colors.
Horizontal stripes make walls appear taller, which is desirable in most living rooms. If you want a bolder look:
- Choose vertical stripes.
- When selecting the width of your stripe, remember that wider stripes are more noticeable and can overwhelm a smaller space.
- If you prefer a more subtle look, opt for narrower stripes.
It’s important to note the direction of your stripes before you begin to paint, as they can impact the space’s ambiance. For example, horizontal stripes evoke calmness and relaxation, while vertical ones convey a sense of strength and dignity.
Regarding the stripe’s width, remember that thinner stripes are easier to handle because you have less work to do with taping off and covering them up. Thicker stripes, however, look more elegant and can be a great focal point in a room.
You may also opt for horizontal and vertical stripes to achieve an eclectic and unique look. Regardless of how you paint your stripes, testing the colors on your walls before making any final decisions is important. Look at them in different lighting throughout the day and see how they appear next to other elements like curtains or furniture.
Consider painting a mural if you want to add a bold and eye-catching statement piece to your living room. Murals can be a great way to show off your personality and style without the expense of buying new furniture. However, painting a mural is not for the faint of heart and requires careful planning to ensure it turns out well.
Before you start, decide what type of mural you want to paint. Are you interested in something simple like a tree or flower, or would you prefer something more complicated, such as a cityscape or cartoon character? Once you have a clear idea of what you want, sketch a basic design to guide your work. This can be done on paper or by using a free design program. It is important to remember how the mural will look when crowded with furniture, bookshelves, and other design elements.
Once you’ve mapped out your design, it’s time to prep the wall for painting. Start by ensuring it is clean and free of dust and debris. You may need to do some light scrubbing or vacuuming if your walls are particularly dirty or greasy. Then, a layer of primer is applied to the entire surface. This will help the paint adhere and cover any imperfections in the wall. After priming, let the wall dry completely before moving on to the actual painting.
When choosing the right colors for your mural, select ones that coordinate well with the rest of the living room. For example, select green paints that complement the surrounding decor if you’re going for a tropical mural. Then, finish the space with accents in other tropical or ocean-inspired shades.
If you need help achieving the perfect lines for your mural, use painter’s tape and carefully measure to ensure you get crisp edges. This is especially important when working with a complex or intricate design. Finally, protect yourself during the painting process by wearing a respirator and working in a well-ventilated area.
The ceiling is the middle child of design canvases, often forgotten but with plenty of untapped potential to make a room stand out. It can be the perfect place to try a bold shade that might overwhelm walls or to create a striking focal point using a pattern or an unexpected color combination.
Painting the ceiling is not difficult, but it does require careful preparation. Begin by taping off anything you don’t want to paint and removing any light fixtures or switch plates. Next, use a damp cloth to wipe the surface and prepare it for paint. Next, apply a coat of primer, and when it’s dry, begin with your base coat. If you’re going with a very dark shade, more than one coat may be needed to get the coverage you want.
Once your base coat is in, you can add some more creative elements to your living room. Bold stripes are popular and can be painted horizontally or vertically, depending on your preference. They look great against white or neutral wall colors and can frame a piece of art or highlight a feature wall.
Another option is to use a single wall as a canvas for a mural. This is a fantastic way to add personality to your space without the cost and hassle of undertaking structural work. You can replicate a favorite piece of art or have an artist create a custom design that fits your space perfectly.
A bright green botanical painting will instantly liven up any living room and work well with various decor styles. The bright colors will look fresh, and the organic shapes will give your space a modern feel.
If you’re going for a more traditional look, a deep jewel tone can add a touch of luxury to your living room. This will work best with large windows, as the natural lighting will help the room appear more spacious. For example, designer Cecilia Casagrande chose rich jewel tones such as Farrow & Ball Hague Blue for this historic Boston home. She then layered in modern and traditional furnishings to complement the paint choice perfectly.l
Painting a room is one of the easiest, most cost-effective ways to change your living space dramatically. Whether it’s for touch-ups, a total redecorate, or to create a feature wall idea, it’s a job that any competent DIYer can do in just a few hours.
Paint isn’t limited to walls either – venturing up to skirting boards, architraves, and the ceiling can also make a huge difference to your living space. It’s important to plan and prepare the area by masking and covering any fittings and surfaces you don’t want to be painted. Then, start by sanding the surface to remove any blemishes, wipe down the walls, and sand again before priming (if needed).
Aside from being a practical decorating tool, living room painting can introduce key design elements that give plain rooms extra oomph. You can create a focal point for your space with a striking block of color, add texture using a different finish, or use paint to create faux architectural details like arches and panels.
If you need more clarification about the effect of a particular shade, consider testing it out on small patches on the wall. Look at it in natural, artificial, and incandescent light at different times of the day to see how it will look once it’s applied to your walls.
Living room painting doesn’t need to be bright or bold – pale shades are a great choice for a warm and cozy environment. Darker hues are also becoming increasingly popular for living rooms, especially in the form of dramatic accent walls. Just balance them with lighter furnishings and flooring to keep the space from feeling too dark and brooding.
You can’t go wrong with a blue shade for a calming, restful atmosphere. This shade works beautifully in contemporary and traditional living rooms and can easily be complemented with various furnishing styles. Just be sure to choose a blue that feels warm, as this can be off-putting and make people uneasy.
Best Home Inspection To Do List
A home inspection can be a scary prospect. But with a little preparation, you can be ready to face your home inspector’s checklist with confidence.
It’s important to de-clutter the property before an inspection so that inspectors can get a good look at walls, ceilings and electrical panels. Also, be sure to clear any gates and fences.
Attic
Your attic is more than just an empty space. It can contain structural damage, poor insulation and improper ventilation, all of which have a huge impact on the overall integrity of your home. A good home inspector will thoroughly examine the attic to ensure it is well-ventilated, has sufficient insulation and that no issues are lurking beneath the surface.
As part of the inspection, your home inspector will look at the chimney and make sure it is in good condition and free of cracks or deterioration. A properly functioning chimney not only keeps your home safe but can also help reduce your energy costs.
Since it is a very accessible part of the house, your home inspector will inspect it for moisture and signs of mold. In addition, your home inspector will check the attic ladder and hatch and will take samples of any leaking roof tiles for further testing.
Your home inspector may recommend the installation of insulation in areas that lack it and will examine the attic for the presence of rodents, critters and other infestations. They will also look at the ductwork and ventilation for any issues.
Most of these issues won’t be deal breakers, but if a significant problem is found, you might want to consider changing your offer or renegotiating the price. You could also choose to buy the home with the repairs done, or you could use them as leverage to get the seller to pay for them.
If you’re planning to buy a home, try to attend the inspection so you can ask questions and see the problems for yourself. It will give you a much more thorough understanding of the property than what’s presented on the inspection report.
Basement or Crawl Space
As the name suggests, a crawl space is underneath a home and is generally accessed by entering it from a basement or by removing a floor panel in a garage. This hidden trove of nooks and crannies contains many of a house’s vital systems components including plumbing, electrical wiring, insulation, venting, and more. Home inspectors will examine these spaces and their connections to the rest of a house. Inspectors may also look for signs of foundation issues like cracks and leaks in crawl spaces, basements or foundation walls.
While crawl spaces aren’t always easy to get into, they are a crucial part of a home and should be included in any inspection. If a crawl space is sealed properly with polyethylene vapor barriers, it should be able to prevent moisture from seeping into the home and creating mold problems and other issues. It can also help homeowners save money by keeping their homes warmer in the winter and more energy efficient by preventing cold air from seeping in through the crawl space.
Crawl spaces can be prone to water damage and mold, particularly if the area is not regularly inspected and a dehumidifier isn’t used. In addition, excessive humidity in crawl spaces can cause wood rot and encourage pests, rodents, and raccoons to enter the home, leading to health and safety issues.
There is no set time in a home’s life when a crawl space needs to be inspected, but it should be done at least once every three years to keep the area in good condition. In addition, homeowners who are considering purchasing a new property should have the crawl space inspected before buying, as this will allow them to be aware of any current or potential problems.
Interior Rooms
The inspector will go through every room in the house to examine the condition of everything, from the ceilings to the cabinets under the sink. They will look for things like visible leaks, the amount of water pressure and whether the home has the type of pipes that can be easily rerouted to make changes in the kitchen or bathroom.
They will also check electrical outlets to see how many there are in each room and test them to ensure they work properly. They will also look for proper insulation in walls, attics, basements and crawlspaces which could help reduce heating and cooling costs.
The inspection will take at least two to three hours. It’s a good idea to be present during the inspection so you can ask questions and get a first-hand explanation of the inspector’s findings.
While the results of a home inspection are not definitive, it can be a useful tool to aid you in making your decision about which property to purchase. Problems uncovered by an inspection may be something you can negotiate with the seller to have fixed before moving in, or they might indicate a serious issue that would be better avoided if you looked for another home.
If you’re looking for a thorough home inspection, you can trust Lou Rubino and his team at Inspect This Home to do the job right. A US Army Veteran, Lou is a licensed home inspector who uses his skills to help homeowners protect their investments. He has a thorough knowledge of the construction process and can spot issues that might not be immediately obvious, such as cracks in the foundation or a roof that’s about to collapse.
Kitchen
Every business that prepares and sells food — from restaurant chains to home-based baking businesses — must comply with health laws, which include regular environmental health inspections. And though home kitchens may seem less likely to be inspected, they’re still subject to the same rules. A home kitchen inspection is based on three key areas: how hygienically the food is handled, the quality of food management procedures, and the physical condition of the area.
During the inspection, the inspector will look at appliances like stoves and ovens, dishwashers, refrigerators, and water heaters to make sure they’re in good working order. They’ll also check the floors, walls, and ceilings to see whether they’re a non-flammable material and that they have a smooth, washable finish. They might check the dishwasher for leaks, the refrigerator to make sure it’s below a set temperature, and storage areas to ensure food is kept up off the floor.
If the home has an old propane tank, the inspector might test for flammability or rust, and they’ll note whether it’s been removed from the property. They might also test for the presence of lead and asbestos, but these tests are typically not part of a standard home inspection.
A home inspector is looking for flaws, and they’ll make note of every one that they find — no matter how minor. This means that the report will be long and might list many items that need repair. However, don’t get hung up on the number of issues; an InterNACHI-certified home inspector will know how to prioritize them and help you decide if any are deal breakers for you. If you can, try to attend the inspection yourself; this will give you the opportunity to discuss the findings with the inspector in person and ask any questions.
Roof
The inspector will also look at the roof and the flashing, and check that all shingles are straight and free of cracks, stains and moss. He’ll also examine the gutters, soffits and fascia boards for signs of damage or rot. And he’ll look at the chimney to make sure it is safe and in good condition.
Even if the roofing materials are top-notch, a roof can fail if it’s not installed correctly. That’s why a home inspector is likely to spend a significant amount of time on the roof, often climbing up there. He’ll check the seams, flashing and all fasteners for proper installation. He’ll also look for any leaks, the existence of ice dams and how well the roof is ventilated.
He might use an infrared camera to see any water damage that isn’t easily visible, especially when it’s behind the walls. This can indicate the presence of mold and the need for costly repair or replacement.
If he notices that there is a lot of water damage, he might recommend that you have a professional do an interior inspection to look for more problems. Likewise, he may recommend a reputable chimney specialist for further testing of the chimney and a more in-depth examination.
It’s important that you tag along with your inspector to learn more about the home, and take your own notes and photographs. That way you can ask questions about anything that you’re unclear about. But remember that there are some things that a home inspector just can’t find, such as a hidden leak in the foundation or a dangerous electrical problem. And the home inspector isn’t required by law to tell you about every flaw, even if it might affect your decision to buy the house.
Hello world!
Welcome to WordPress. This is your first post. Edit or delete it, then start writing!